Helm & GitOps: A Complete Beginner's Guide

Orchestration Made Easy with Kubernetes
📚 Table of Contents
- Introduction to Kubernetes Package Management
- Helm Charts Fundamentals
- Helm for Microservices
- GitOps Concepts
- ArgoCD Configuration
- Complete Workflow Example
- Best Practices
🎯 Introduction to Kubernetes Package Management
The Problem: Managing Complex Kubernetes Applications
Imagine you're organizing a massive event. You need:
- Venue booking
- Catering
- Entertainment
- Decorations
- Security
Without a coordinator, you'd manually manage each vendor, track changes, and ensure everything works together. This is what deploying applications on Kubernetes feels like without Helm.
What is Kubernetes?
Analogy: Think of Kubernetes as a smart apartment building manager that:
- Assigns apartments (containers) to tenants (applications)
- Ensures everyone has electricity and water (resources)
- Handles complaints and repairs (self-healing)
- Manages the lobby, elevators, and common areas (networking)
Key Kubernetes Concepts
| Concept | Analogy | Description |
|---|---|---|
| Pod | Apartment | Smallest deployable unit, contains one or more containers |
| Deployment | Building Blueprint | Defines how many pods, which version, how to update |
| Service | Address Book | Provides stable network endpoint to access pods |
| ConfigMap | Settings File | Stores configuration data |
| Secret | Safe Box | Stores sensitive data (passwords, keys) |
| Namespace | Building Floor | Logical cluster subdivision |
🎁 Helm Charts Fundamentals
What is Helm?
Helm = The Package Manager for Kubernetes
Analogy: Helm is like a meal kit delivery service (HelloFresh, Blue Apron):
- Without Helm: You manually buy ingredients, write recipes, measure quantities, adjust for servings
- With Helm: You get pre-packaged ingredients, tested recipes, and easy customization
Why Do We Need Helm?
Before Helm:
# You need to manually apply each file
kubectl apply -f deployment.yaml
kubectl apply -f service.yaml
kubectl apply -f configmap.yaml
kubectl apply -f secret.yaml
kubectl apply -f ingress.yaml
# Repeat for each environment (dev, staging, prod)
# Manually manage versions, rollbacks, dependencies
With Helm:
# One command to install everything
helm install my-app ./my-chart
Helm Architecture
Core Helm Concepts
| Concept | Analogy | Description |
|---|---|---|
| Chart | Recipe Box | Package containing all resources needed to run an app |
| Release | Cooked Meal | Running instance of a chart in your cluster |
| Repository | Recipe Website | Collection of charts you can download |
| Values | Ingredient Substitutions | Configuration options to customize deployment |
| Templates | Recipe Instructions | Kubernetes YAML files with placeholders |
Helm Chart Structure
my-awesome-chart/
├── Chart.yaml              # Chart metadata (name, version, description)
├── values.yaml             # Default configuration values
├── charts/                 # Dependency charts (sub-charts)
├── templates/              # Kubernetes resource templates
│   ├── deployment.yaml     # Pod deployment template
│   ├── service.yaml        # Service template
│   ├── ingress.yaml        # Ingress template
│   ├── configmap.yaml      # ConfigMap template
│   ├── _helpers.tpl        # Reusable template functions
│   └── NOTES.txt           # Post-installation instructions
├── .helmignore             # Files to ignore (like .gitignore)
└── README.md               # Documentation
Understanding Chart.yaml
apiVersion: v2                      # Helm API version
name: my-awesome-chart              # Chart name
description: A simple Helm chart    # What this chart does
type: application                   # Type: application or library
version: 0.1.0                      # Chart version (SemVer)
appVersion: "1.0"                   # Version of the app being deployed
keywords:
  - nginx
  - web
maintainers:
  - name: Your Name
    email: you@example.com
dependencies:                       # Other charts this needs
  - name: redis
    version: "~10.5.0"
    repository: "https://charts.bitnami.com/bitnami"
Understanding values.yaml
Analogy: values.yaml is like a customization form at a restaurant:
- Want extra cheese? ✓
- How spicy? Medium
- Portion size? Large
# values.yaml - Configuration options

# Number of replicas
replicaCount: 3

# Container image
image:
  repository: nginx
  tag: "1.25.0"
  pullPolicy: IfNotPresent

# Service configuration
service:
  type: LoadBalancer
  port: 80
  targetPort: 8080

# Resource limits
resources:
  limits:
    cpu: 500m
    memory: 512Mi
  requests:
    cpu: 250m
    memory: 256Mi

# Environment-specific settings
environment: production

# Feature flags
features:
  monitoring: true
  logging: true
Understanding Templates
Templates use Go templating with special Helm functions:
# templates/deployment.yaml
apiVersion: apps/v1
kind: Deployment
metadata:
  name: {{ .Release.Name }}-{{ .Chart.Name }}
  labels:
    app: {{ .Chart.Name }}
    version: {{ .Chart.AppVersion }}
spec:
  replicas: {{ .Values.replicaCount }}
  selector:
    matchLabels:
      app: {{ .Chart.Name }}
  template:
    metadata:
      labels:
        app: {{ .Chart.Name }}
    spec:
      containers:
      - name: {{ .Chart.Name }}
        image: "{{ .Values.image.repository }}:{{ .Values.image.tag }}"
        ports:
        - containerPort: {{ .Values.service.targetPort }}
        resources:
          {{- toYaml .Values.resources | nindent 10 }}
Template Variables Explained:
| Variable | Description | Example |
|---|---|---|
{{ .Release.Name }} | Name you give during installation | my-app |
{{ .Chart.Name }} | Chart name from Chart.yaml | my-awesome-chart |
{{ .Chart.Version }} | Chart version | 0.1.0 |
{{ .Values.xxx }} | Value from values.yaml | .Values.replicaCount |
🔧 Hands-On: Creating Your First Helm Chart
Step 1: Install Helm
# macOS
brew install helm

# Linux
curl https://raw.githubusercontent.com/helm/helm/main/scripts/get-helm-3 | bash

# Windows (using Chocolatey)
choco install kubernetes-helm

# Verify installation
helm version
Step 2: Create a New Chart
# Create a new chart called "my-nginx-app"
helm create my-nginx-app

# Navigate to the chart
cd my-nginx-app

# View the structure
tree .
Step 3: Customize values.yaml
# Edit values.yaml
nano values.yaml
Replace with this simple configuration:
replicaCount: 2

image:
  repository: nginx
  tag: "1.25.0"
  pullPolicy: IfNotPresent

service:
  type: NodePort
  port: 80
  targetPort: 80

resources:
  limits:
    cpu: 200m
    memory: 256Mi
  requests:
    cpu: 100m
    memory: 128Mi
Step 4: Validate Your Chart
# Lint the chart (check for errors)
helm lint .

# Dry-run to see what would be deployed
helm install --dry-run --debug my-nginx-app .

# Template rendering (see final YAML)
helm template my-nginx-app .
Step 5: Install the Chart
# Install in your Kubernetes cluster
helm install my-nginx-app .

# Check the installation
helm list

# Check the pods
kubectl get pods

# Check the service
kubectl get svc
Expected Output:
NAME: my-nginx-app
LAST DEPLOYED: Thu Oct 16 2025 10:30:00
NAMESPACE: default
STATUS: deployed
REVISION: 1
Step 6: Upgrade Your Chart
# Modify values.yaml (e.g., change replicas to 3)
nano values.yaml

# Upgrade the release
helm upgrade my-nginx-app .

# Check revision history
helm history my-nginx-app
Step 7: Rollback if Needed
# Rollback to previous version
helm rollback my-nginx-app 1

# Check status
helm status my-nginx-app
Step 8: Uninstall
# Uninstall the release
helm uninstall my-nginx-app

# Verify removal
kubectl get pods
🏗️ Helm for Microservices
Understanding Microservices Architecture
Analogy: A microservice architecture is like a shopping mall:
- Each store (microservice) operates independently
- Stores communicate through the mall directory (API)
- If one store closes, others keep operating
- Easy to add new stores or renovate existing ones
Real-World Example: Google's Online Boutique
Let's use the Google Cloud microservices demo as our example.
Architecture Overview
| Service | Language | Purpose |
|---|---|---|
| frontend | Go | Web UI |
| cartservice | C# | Shopping cart |
| productcatalogservice | Go | Product information |
| currencyservice | Node.js | Currency conversion |
| paymentservice | Node.js | Payment processing |
| shippingservice | Go | Shipping cost calculation |
| emailservice | Python | Order confirmation emails |
| checkoutservice | Go | Order checkout |
| recommendationservice | Python | Product recommendations |
| adservice | Java | Advertisement |
| redis-cart | Redis | Cart data storage |
Setting Up the Microservices Demo
Option 1: Quick Start (Using Pre-built Manifests)
# Clone the repository
git clone --depth 1 --branch v0 https://github.com/GoogleCloudPlatform/microservices-demo.git
cd microservices-demo

# Apply all services at once
kubectl apply -f ./release/kubernetes-manifests.yaml

# Wait for pods to be ready
kubectl get pods -w

# Get the frontend URL
kubectl get service frontend-external
Option 2: Using Helm (Recommended for Production)
First, let's create a Helm chart for the Online Boutique.
Creating a Helm Chart for Microservices
# Create the chart structure
helm create online-boutique
cd online-boutique
Chart.yaml
apiVersion: v2
name: online-boutique
description: Google Cloud microservices demo application
type: application
version: 0.1.0
appVersion: "v0.10.0"
keywords:
  - microservices
  - demo
  - ecommerce
maintainers:
  - name: DevOps Team
    email: devops@example.com
values.yaml for Microservices
# Global settings
global:
  environment: production
  domain: boutique.example.com

# Frontend service
frontend:
  replicaCount: 2
  image:
    repository: gcr.io/google-samples/microservices-demo/frontend
    tag: v0.10.0
  service:
    type: LoadBalancer
    port: 80
  resources:
    limits:
      cpu: 200m
      memory: 256Mi
    requests:
      cpu: 100m
      memory: 128Mi

# Product Catalog Service
productcatalog:
  replicaCount: 2
  image:
    repository: gcr.io/google-samples/microservices-demo/productcatalogservice
    tag: v0.10.0
  service:
    port: 3550
  resources:
    limits:
      cpu: 200m
      memory: 128Mi

# Cart Service
cartservice:
  replicaCount: 2
  image:
    repository: gcr.io/google-samples/microservices-demo/cartservice
    tag: v0.10.0
  service:
    port: 7070
  resources:
    limits:
      cpu: 300m
      memory: 256Mi

# Redis Cache
redis:
  enabled: true
  architecture: standalone
  auth:
    enabled: false
  master:
    resources:
      limits:
        cpu: 200m
        memory: 256Mi

# Checkout Service
checkoutservice:
  replicaCount: 2
  image:
    repository: gcr.io/google-samples/microservices-demo/checkoutservice
    tag: v0.10.0
  service:
    port: 5050
  resources:
    limits:
      cpu: 200m
      memory: 128Mi

# Currency Service
currencyservice:
  replicaCount: 2
  image:
    repository: gcr.io/google-samples/microservices-demo/currencyservice
    tag: v0.10.0
  service:
    port: 7000
  resources:
    limits:
      cpu: 200m
      memory: 128Mi

# Payment Service
paymentservice:
  replicaCount: 2
  image:
    repository: gcr.io/google-samples/microservices-demo/paymentservice
    tag: v0.10.0
  service:
    port: 50051
  resources:
    limits:
      cpu: 200m
      memory: 128Mi

# Email Service
emailservice:
  replicaCount: 2
  image:
    repository: gcr.io/google-samples/microservices-demo/emailservice
    tag: v0.10.0
  service:
    port: 5000
  resources:
    limits:
      cpu: 200m
      memory: 128Mi

# Shipping Service
shippingservice:
  replicaCount: 2
  image:
    repository: gcr.io/google-samples/microservices-demo/shippingservice
    tag: v0.10.0
  service:
    port: 50051
  resources:
    limits:
      cpu: 200m
      memory: 128Mi

# Recommendation Service
recommendationservice:
  replicaCount: 2
  image:
    repository: gcr.io/google-samples/microservices-demo/recommendationservice
    tag: v0.10.0
  service:
    port: 8080
  resources:
    limits:
      cpu: 200m
      memory: 256Mi

# Ad Service
adservice:
  replicaCount: 2
  image:
    repository: gcr.io/google-samples/microservices-demo/adservice
    tag: v0.10.0
  service:
    port: 9555
  resources:
    limits:
      cpu: 300m
      memory: 300Mi
Template Example: templates/frontend-deployment.yaml
apiVersion: apps/v1
kind: Deployment
metadata:
  name: {{ .Release.Name }}-frontend
  labels:
    app: frontend
    chart: {{ .Chart.Name }}-{{ .Chart.Version }}
spec:
  replicas: {{ .Values.frontend.replicaCount }}
  selector:
    matchLabels:
      app: frontend
  template:
    metadata:
      labels:
        app: frontend
    spec:
      containers:
      - name: frontend
        image: "{{ .Values.frontend.image.repository }}:{{ .Values.frontend.image.tag }}"
        ports:
        - containerPort: 8080
        env:
        - name: PORT
          value: "8080"
        - name: PRODUCT_CATALOG_SERVICE_ADDR
          value: "{{ .Release.Name }}-productcatalog:3550"
        - name: CURRENCY_SERVICE_ADDR
          value: "{{ .Release.Name }}-currencyservice:7000"
        - name: CART_SERVICE_ADDR
          value: "{{ .Release.Name }}-cartservice:7070"
        - name: RECOMMENDATION_SERVICE_ADDR
          value: "{{ .Release.Name }}-recommendationservice:8080"
        - name: SHIPPING_SERVICE_ADDR
          value: "{{ .Release.Name }}-shippingservice:50051"
        - name: CHECKOUT_SERVICE_ADDR
          value: "{{ .Release.Name }}-checkoutservice:5050"
        - name: AD_SERVICE_ADDR
          value: "{{ .Release.Name }}-adservice:9555"
        resources:
          {{- toYaml .Values.frontend.resources | nindent 10 }}
        livenessProbe:
          httpGet:
            path: /_healthz
            port: 8080
          initialDelaySeconds: 10
          periodSeconds: 10
        readinessProbe:
          httpGet:
            path: /_healthz
            port: 8080
          initialDelaySeconds: 10
          periodSeconds: 10
Template Example: templates/frontend-service.yaml
apiVersion: v1
kind: Service
metadata:
  name: {{ .Release.Name }}-frontend-external
  labels:
    app: frontend
spec:
  type: {{ .Values.frontend.service.type }}
  selector:
    app: frontend
  ports:
  - name: http
    port: {{ .Values.frontend.service.port }}
    targetPort: 8080
Installing Microservices with Helm
# Install the entire application
helm install boutique ./online-boutique

# Check deployment status
helm status boutique

# Watch pods coming up
kubectl get pods -l "release=boutique" -w

# Get the frontend URL
kubectl get service boutique-frontend-external

# Test different configurations for different environments
# Development environment
helm install boutique-dev ./online-boutique \
  --set frontend.replicaCount=1 \
  --set global.environment=development

# Production environment with more replicas
helm install boutique-prod ./online-boutique \
  --set frontend.replicaCount=5 \
  --set productcatalog.replicaCount=5 \
  --set global.environment=production
Environment-Specific Values Files
Create separate values files for each environment:
values-dev.yaml
global:
  environment: development

frontend:
  replicaCount: 1
  resources:
    limits:
      cpu: 100m
      memory: 128Mi

productcatalog:
  replicaCount: 1
values-prod.yaml
global:
  environment: production

frontend:
  replicaCount: 5
  resources:
    limits:
      cpu: 500m
      memory: 512Mi

productcatalog:
  replicaCount: 5
Install with environment-specific values:
# Development
helm install boutique-dev ./online-boutique -f values-dev.yaml

# Production
helm install boutique-prod ./online-boutique -f values-prod.yaml
🔄 GitOps Concepts
What is GitOps?
Analogy: GitOps is like having a smart home system:
- Your desired home state is in an app (Git repository)
- "Temperature: 72°F, Lights: On, Security: Armed"
- The system constantly checks and adjusts to match your settings
- Any change to settings is logged and versioned
- You can easily revert to yesterday's settings
Traditional Deployment vs GitOps:
GitOps Principles
| Principle | Description | Benefit |
|---|---|---|
| Declarative | System state described declaratively | Clear, version-controlled desired state |
| Versioned & Immutable | Everything in Git, never modified in place | Complete audit trail, easy rollback |
| Pulled Automatically | Software agents pull desired state | No external credentials needed |
| Continuously Reconciled | Software agents verify actual state | Self-healing, drift detection |
Why GitOps?
Without GitOps:
# Developer manually deploys
kubectl apply -f deployment.yaml
# Who deployed? When? Why? What was the previous state?
# No audit trail, hard to rollback, risky
With GitOps:
# Developer commits change to Git
git add deployment.yaml
git commit -m "Increase replicas to 5 for Black Friday"
git push

# ArgoCD automatically:
# 1. Detects the change
# 2. Validates the change
# 3. Applies to cluster
# 4. Monitors for drift
# Complete audit trail in Git history!
GitOps Workflow
Repository Structure for GitOps
Two Repository Approach (Recommended):
app-source-repo/          # Application Code
├── src/
│   └── main.go
├── Dockerfile
└── .github/
    └── workflows/
        └── ci.yaml

app-config-repo/          # Kubernetes Manifests
├── environments/
│   ├── dev/
│   │   ├── values.yaml
│   │   └── kustomization.yaml
│   ├── staging/
│   │   └── values.yaml
│   └── prod/
│       └── values.yaml
├── helm-charts/
│   └── my-app/
│       ├── Chart.yaml
│       ├── values.yaml
│       └── templates/
└── argocd/
    └── applications/
        ├── dev-app.yaml
        ├── staging-app.yaml
        └── prod-app.yaml
Why Separate Repositories?
- Security: Different access controls
- Clarity: Code changes vs config changes
- Automation: CI/CD pipelines are simpler
- Auditability: Clear separation of concerns
🎯 ArgoCD Configuration
What is ArgoCD?
Analogy: ArgoCD is like a vigilant security guard for your cluster:
- Constantly compares what's in Git (the blueprint) vs what's running (the building)
- Automatically fixes discrepancies
- Alerts you to any unauthorized changes
- Keeps detailed logs of all activities
ArgoCD Architecture Components
| Component | Purpose | Analogy |
|---|---|---|
| API Server | Handles API calls, UI, CLI | Receptionist |
| Repository Server | Fetches manifests from Git | Librarian |
| Application Controller | Monitors apps, syncs state | Quality Inspector |
Installing ArgoCD
Step 1: Create Namespace and Install
Better use helm https://github.com/argoproj/argo-helm/tree/main/charts/argo-cd
# Create namespace
kubectl create namespace argocd

# Install ArgoCD
kubectl apply -n argocd -f https://raw.githubusercontent.com/argoproj/argo-cd/stable/manifests/install.yaml

# Wait for pods to be ready
kubectl get pods -n argocd -w
Step 2: Access ArgoCD UI
Option 1: Port Forward (Quick Test)
# Forward port 8080 to ArgoCD server
kubectl port-forward svc/argocd-server -n argocd 8080:443

# Access at: https://localhost:8080
Option 2: LoadBalancer (Production)
# Change service type to LoadBalancer
kubectl patch svc argocd-server -n argocd -p '{"spec": {"type": "LoadBalancer"}}'

# Get external IP
kubectl get svc argocd-server -n argocd
Option 3: Ingress (Recommended for Production)
# argocd-ingress.yaml
apiVersion: networking.k8s.io/v1
kind: Ingress
metadata:
  name: argocd-server-ingress
  namespace: argocd
  annotations:
    cert-manager.io/cluster-issuer: letsencrypt-prod
    nginx.ingress.kubernetes.io/ssl-passthrough: "true"
    nginx.ingress.kubernetes.io/backend-protocol: "HTTPS"
spec:
  ingressClassName: nginx
  rules:
  - host: argocd.example.com
    http:
      paths:
      - path: /
        pathType: Prefix
        backend:
          service:
            name: argocd-server
            port:
              number: 443
  tls:
  - hosts:
    - argocd.example.com
    secretName: argocd-tls
Apply ingress:
kubectl apply -f argocd-ingress.yaml
Step 3: Get Initial Admin Password
# Get the initial admin password
kubectl -n argocd get secret argocd-initial-admin-secret -o jsonpath="{.data.password}" | base64 -d && echo
Default Credentials:
- Username:
admin - Password: (from the command above)
Step 4: Login with CLI
# Install ArgoCD CLI
# macOS
brew install argocd

# Linux
curl -sSL -o argocd https://github.com/argoproj/argo-cd/releases/latest/download/argocd-linux-amd64
chmod +x argocd
sudo mv argocd /usr/local/bin/

# Login
argocd login localhost:8080 --username admin --password <initial-password>

# Change password
argocd account update-password
Configuring Your First Application
Method 1: Using CLI
# Create application
argocd app create boutique-dev \
  --repo https://github.com/your-org/app-config-repo.git \
  --path helm-charts/online-boutique \
  --dest-server https://kubernetes.default.svc \
  --dest-namespace default \
  --values values-dev.yaml \
  --sync-policy automated \
  --auto-prune \
  --self-heal

# Check application status
argocd app get boutique-dev

# Sync manually (if not auto-sync)
argocd app sync boutique-dev

# View logs
argocd app logs boutique-dev
Method 2: Using YAML Manifest (Recommended)
# argocd-application.yaml
apiVersion: argoproj.io/v1alpha1
kind: Application
metadata:
  name: boutique-dev
  namespace: argocd
  # Finalizer that ensures cascading deletes
  finalizers:
    - resources-finalizer.argocd.argoproj.io
spec:
  # The project the application belongs to
  project: default

  # Source of the application manifests
  source:
    repoURL: https://github.com/your-org/app-config-repo.git
    targetRevision: HEAD  # Can be branch, tag, or commit SHA
    path: helm-charts/online-boutique

    # Helm specific config
    helm:
      # Use specific values file
      valueFiles:
        - values-dev.yaml

      # Override specific values
      parameters:
        - name: frontend.replicaCount
          value: "2"
        - name: global.environment
          value: "development"

  # Destination cluster and namespace
  destination:
    server: https://kubernetes.default.svc
    namespace: default

  # Sync policy
  syncPolicy:
    automated:
      # Automatically sync when Git changes
      prune: true        # Delete resources not in Git
      selfHeal: true     # Force sync if cluster state changes
      allowEmpty: false  # Don't sync if repo is empty

    syncOptions:
      - CreateNamespace=true  # Auto-create namespace if needed

    # Retry config
    retry:
      limit: 5
      backoff:
        duration: 5s
        factor: 2
        maxDuration: 3m

  # Health check configuration
  ignoreDifferences:
    - group: apps
      kind: Deployment
      jsonPointers:
        - /spec/replicas  # Ignore if HPA modifies replicas
Apply the application:
kubectl apply -f argocd-application.yaml

# Watch it sync
kubectl get applications -n argocd -w
ArgoCD Sync Policies
| Policy | Description | Use Case |
|---|---|---|
| Manual | Require manual trigger to sync | Production deployments requiring approval |
| Automated | Auto-sync on Git changes | Development/staging environments |
| Prune | Delete resources not in Git | Keep cluster clean |
| Self-Heal | Revert manual cluster changes | Enforce GitOps principles |
Advanced ArgoCD Configurations
Multi-Environment Setup
# argocd-apps/dev-app.yaml
apiVersion: argoproj.io/v1alpha1
kind: Application
metadata:
  name: boutique-dev
  namespace: argocd
spec:
  project: boutique
  source:
    repoURL: https://github.com/your-org/app-config-repo.git
    targetRevision: develop
    path: helm-charts/online-boutique
    helm:
      valueFiles:
        - values-dev.yaml
  destination:
    server: https://kubernetes.default.svc
    namespace: dev
  syncPolicy:
    automated:
      prune: true
      selfHeal: true
---
# argocd-apps/staging-app.yaml
apiVersion: argoproj.io/v1alpha1
kind: Application
metadata:
  name: boutique-staging
  namespace: argocd
spec:
  project: boutique
  source:
    repoURL: https://github.com/your-org/app-config-repo.git
    targetRevision: main
    path: helm-charts/online-boutique
    helm:
      valueFiles:
        - values-staging.yaml
  destination:
    server: https://kubernetes.default.svc
    namespace: staging
  syncPolicy:
    automated:
      prune: true
      selfHeal: false  # Require approval for staging
---
# argocd-apps/prod-app.yaml
apiVersion: argoproj.io/v1alpha1
kind: Application
metadata:
  name: boutique-prod
  namespace: argocd
spec:
  project: boutique
  source:
    repoURL: https://github.com/your-org/app-config-repo.git
    targetRevision: v1.0.0  # Use tags for prod
    path: helm-charts/online-boutique
    helm:
      valueFiles:
        - values-prod.yaml
  destination:
    server: https://kubernetes.default.svc
    namespace: prod
  syncPolicy:
    automated: false  # Manual sync for production
App of Apps Pattern
Create a master app that manages other apps:
# argocd-apps/root-app.yaml
apiVersion: argoproj.io/v1alpha1
kind: Application
metadata:
  name: root-app
  namespace: argocd
spec:
  project: default
  source:
    repoURL: https://github.com/your-org/app-config-repo.git
    targetRevision: HEAD
    path: argocd-apps
  destination:
    server: https://kubernetes.default.svc
    namespace: argocd
  syncPolicy:
    automated:
      prune: true
      selfHeal: true
Now all your apps are managed by this root app!
kubectl apply -f argocd-apps/root-app.yaml
ArgoCD Projects (Multi-Tenancy)
# argocd-project.yaml
apiVersion: argoproj.io/v1alpha1
kind: AppProject
metadata:
  name: boutique
  namespace: argocd
spec:
  description: Online Boutique Application

  # Allow deployments to these clusters
  destinations:
    - namespace: dev
      server: https://kubernetes.default.svc
    - namespace: staging
      server: https://kubernetes.default.svc
    - namespace: prod
      server: https://kubernetes.default.svc

  # Allow pulling from these Git repos
  sourceRepos:
    - https://github.com/your-org/app-config-repo.git

  # Allowed resource types
  clusterResourceWhitelist:
    - group: ''
      kind: Namespace

  namespaceResourceWhitelist:
    - group: 'apps'
      kind: Deployment
    - group: ''
      kind: Service
    - group: ''
      kind: ConfigMap
    - group: ''
      kind: Secret

  # RBAC roles
  roles:
    - name: developer
      description: Developers can view and sync
      policies:
        - p, proj:boutique:developer, applications, get, boutique/*, allow
        - p, proj:boutique:developer, applications, sync, boutique/dev-*, allow
    - name: admin
      description: Admins have full access
      policies:
        - p, proj:boutique:admin, applications, *, boutique/*, allow
🔄 Complete Workflow Example
Let's put everything together with a real-world scenario!
Scenario: Deploying Online Boutique with GitOps
Step-by-Step Implementation
1. Repository Setup
App Source Repository:
# Create and clone your app repo
git clone https://github.com/your-org/online-boutique-app.git
cd online-boutique-app

# Structure
# online-boutique-app/
# ├── src/
# │   ├── frontend/
# │   ├── cartservice/
# │   └── productcatalogservice/
# ├── Dockerfile
# └── .github/
#     └── workflows/
#         └── ci.yaml
Config Repository:
# Create and clone your config repo
git clone https://github.com/your-org/online-boutique-config.git
cd online-boutique-config

# Structure
# online-boutique-config/
# ├── helm-charts/
# │   └── online-boutique/
# ├── environments/
# │   ├── dev/
# │   ├── staging/
# │   └── prod/
# └── argocd-apps/
2. CI Pipeline (GitHub Actions)
Create .github/workflows/ci.yaml:
name: CI/CD Pipeline

on:
  push:
    branches: [ main, develop ]
  pull_request:
    branches: [ main ]

env:
  REGISTRY: ghcr.io
  IMAGE_NAME: ${{ github.repository }}

jobs:
  build-and-push:
    runs-on: ubuntu-latest
    permissions:
      contents: write
      packages: write

    steps:
      - name: Checkout code
        uses: actions/checkout@v3

      - name: Set up Docker Buildx
        uses: docker/setup-buildx-action@v2

      - name: Log in to GitHub Container Registry
        uses: docker/login-action@v2
        with:
          registry: ${{ env.REGISTRY }}
          username: ${{ github.actor }}
          password: ${{ secrets.GITHUB_TOKEN }}

      - name: Extract metadata
        id: meta
        uses: docker/metadata-action@v4
        with:
          images: ${{ env.REGISTRY }}/${{ env.IMAGE_NAME }}
          tags: |
            type=ref,event=branch
            type=sha,prefix={{branch}}-
            type=semver,pattern={{version}}

      - name: Build and push Docker image
        uses: docker/build-push-action@v4
        with:
          context: .
          push: true
          tags: ${{ steps.meta.outputs.tags }}
          labels: ${{ steps.meta.outputs.labels }}
          cache-from: type=gha
          cache-to: type=gha,mode=max

      - name: Update Helm values
        env:
          IMAGE_TAG: ${{ github.sha }}
        run: |
          # Clone config repo
          git clone https://github.com/your-org/online-boutique-config.git
          cd online-boutique-config

          # Update image tag in values file
          sed -i "s/tag: .*/tag: \"$IMAGE_TAG\"/" \
            environments/dev/values.yaml

          # Commit and push
          git config user.name "GitHub Actions"
          git config user.email "actions@github.com"
          git add environments/dev/values.yaml
          git commit -m "Update image tag to $IMAGE_TAG"
          git push https://x-access-token:${{ secrets.GH_PAT }}@github.com/your-org/online-boutique-config.git
3. Helm Chart Configuration
helm-charts/online-boutique/values.yaml:
# Default values
global:
  environment: development
  imageRegistry: ghcr.io/your-org

frontend:
  enabled: true
  replicaCount: 2
  image:
    repository: online-boutique-app/frontend
    tag: "latest"
    pullPolicy: IfNotPresent
  service:
    type: ClusterIP
    port: 80
    targetPort: 8080
  resources:
    limits:
      cpu: 200m
      memory: 256Mi
    requests:
      cpu: 100m
      memory: 128Mi
  autoscaling:
    enabled: false
    minReplicas: 2
    maxReplicas: 10
    targetCPUUtilizationPercentage: 80

# Similar blocks for other services...
productcatalog:
  enabled: true
  replicaCount: 2
  # ... config

cartservice:
  enabled: true
  replicaCount: 2
  # ... config

# etc.
environments/dev/values.yaml:
global:
  environment: development

frontend:
  replicaCount: 1
  resources:
    limits:
      cpu: 100m
      memory: 128Mi

productcatalog:
  replicaCount: 1
environments/prod/values.yaml:
global:
  environment: production

frontend:
  replicaCount: 5
  autoscaling:
    enabled: true
    minReplicas: 5
    maxReplicas: 20
  resources:
    limits:
      cpu: 500m
      memory: 512Mi

productcatalog:
  replicaCount: 5
  autoscaling:
    enabled: true
4. ArgoCD Application Setup
argocd-apps/boutique-dev.yaml:
apiVersion: argoproj.io/v1alpha1
kind: Application
metadata:
  name: boutique-dev
  namespace: argocd
  finalizers:
    - resources-finalizer.argocd.argoproj.io
spec:
  project: default
  source:
    repoURL: https://github.com/your-org/online-boutique-config.git
    targetRevision: develop
    path: helm-charts/online-boutique
    helm:
      valueFiles:
        - ../../environments/dev/values.yaml
  destination:
    server: https://kubernetes.default.svc
    namespace: dev
  syncPolicy:
    automated:
      prune: true
      selfHeal: true
    syncOptions:
      - CreateNamespace=true
5. Deploy Everything
# 1. Install ArgoCD (if not already)
kubectl create namespace argocd
kubectl apply -n argocd -f https://raw.githubusercontent.com/argoproj/argo-cd/stable/manifests/install.yaml

# 2. Apply ArgoCD applications
kubectl apply -f argocd-apps/boutique-dev.yaml

# 3. Watch the magic happen!
kubectl get applications -n argocd
argocd app get boutique-dev --watch

# 4. Access the application
kubectl get svc -n dev
6. Make a Change and Watch GitOps in Action
# In your app source repo
cd online-boutique-app
echo "console.log('New feature!');" >> src/frontend/app.js

git add .
git commit -m "Add new feature"
git push origin main

# GitHub Actions will:
# 1. Build new image
# 2. Push to registry
# 3. Update config repo

# ArgoCD will:
# 1. Detect the change in config repo
# 2. Pull new manifests
# 3. Apply to cluster
# 4. Show sync status in UI

# Watch it happen:
argocd app watch boutique-dev
Troubleshooting Common Issues
Issue 1: Application Out of Sync
# Check differences
argocd app diff boutique-dev

# Manual sync
argocd app sync boutique-dev

# Force sync (if needed)
argocd app sync boutique-dev --force
Issue 2: Image Pull Errors
# Create image pull secret
kubectl create secret docker-registry regcred \
  --docker-server=ghcr.io \
  --docker-username=your-username \
  --docker-password=your-token \
  -n dev

# Reference in deployment
# Add to values.yaml:
imagePullSecrets:
  - name: regcred
Issue 3: Health Check Failures
# Check pod logs
kubectl logs -n dev deployment/boutique-dev-frontend

# Check events
kubectl get events -n dev --sort-by='.lastTimestamp'

# Describe deployment
kubectl describe deployment boutique-dev-frontend -n dev
📋 Best Practices
Helm Best Practices
-
Version Everything
# Always specify versionsapiVersion: v2version: 1.2.3appVersion: "2.0.1" -
Use Semantic Versioning
- MAJOR.MINOR.PATCH (1.2.3)
- MAJOR: Breaking changes
- MINOR: New features
- PATCH: Bug fixes
-
Document Your Charts
# README.md## Configuration| Parameter | Description | Default ||-----------|-------------|---------|| replicaCount | Number of replicas | 3 | -
Use _helpers.tpl for Reusable Templates
{{- define "myapp.fullname" -}}{{- printf "%s-%s" .Release.Name .Chart.Name | trunc 63 | trimSuffix "-" }}{{- end }} -
Always Set Resource Limits
resources:limits:cpu: 500mmemory: 512Mirequests:cpu: 250mmemory: 256Mi
GitOps Best Practices
-
Separate Code from Config
- One repo for application code
- One repo for Kubernetes manifests
-
Use Branches for Environments
develop→ dev environmentmain→ staging environmenttags→ production environment
-
Implement PR Reviews
# GitHub branch protection- Require pull request reviews- Require status checks- Require signed commits -
Never Commit Secrets
# Use Sealed Secrets or External Secrets# Never in Git:password: mypassword # ❌# Instead:apiVersion: bitnami.com/v1alpha1kind: SealedSecret -
Tag Production Releases
git tag -a v1.0.0 -m "Production release"git push origin v1.0.0
ArgoCD Best Practices
-
Use Projects for Multi-Tenancy
# Isolate teamsspec:project: team-a -
Enable Automated Sync with Caution
# Dev: auto-sync ✓# Staging: auto-sync with approval# Prod: manual sync -
Configure Notifications
# Slack, email notificationsapiVersion: v1kind: ConfigMapmetadata:name: argocd-notifications-cmdata:service.slack: |token: $slack-token -
Use Health Checks
# Custom health assessmentshealthCheck:http:path: /healthz -
Implement RBAC
# Role-based accessp, role:developer, applications, get, */*, allowp, role:developer, applications, sync, */dev-*, allow
Security Best Practices
-
Scan Images
# In CI pipeline- name: Scan imageuses: aquasecurity/trivy-action@master -
Use Non-Root Containers
securityContext:runAsNonRoot: truerunAsUser: 1000 -
Implement Network Policies
apiVersion: networking.k8s.io/v1kind: NetworkPolicymetadata:name: deny-allspec:podSelector: {}policyTypes:- Ingress- Egress -
Rotate Credentials
# Regular rotationargocd account update-password -
Audit Logs
# Monitor ArgoCD activitykubectl logs -n argocd deployment/argocd-server
🎓 Quick Reference Commands
Helm Commands
# Chart Management
helm create <chart-name>              # Create new chart
helm lint <chart>                     # Validate chart
helm template <chart>                 # Render templates
helm package <chart>                  # Package chart

# Repository Management
helm repo add <name> <url>            # Add repository
helm repo update                      # Update repositories
helm search repo <keyword>            # Search charts

# Release Management
helm install <name> <chart>           # Install chart
helm upgrade <name> <chart>           # Upgrade release
helm rollback <name> <revision>       # Rollback release
helm uninstall <name>                 # Delete release
helm list                             # List releases
helm history <name>                   # View release history

# Debugging
helm get values <name>                # Show values
helm get manifest <name>              # Show manifests
helm get all <name>                   # Show everything
ArgoCD Commands
# Application Management
argocd app create <name>              # Create app
argocd app get <name>                 # Get app details
argocd app list                       # List apps
argocd app delete <name>              # Delete app

# Sync Operations
argocd app sync <name>                # Sync app
argocd app sync <name> --force        # Force sync
argocd app wait <name>                # Wait for sync

# Monitoring
argocd app watch <name>               # Watch app status
argocd app logs <name>                # View logs
argocd app diff <name>                # Show differences

# Repository Management
argocd repo add <url>                 # Add repository
argocd repo list                      # List repositories
Kubectl Commands
# Pod Management
kubectl get pods                      # List pods
kubectl logs <pod>                    # View logs
kubectl exec -it <pod> -- /bin/bash   # Shell into pod
kubectl describe pod <pod>            # Describe pod

# Deployment Management
kubectl get deployments               # List deployments
kubectl scale deployment <name> --replicas=5
kubectl rollout status deployment/<name>
kubectl rollout history deployment/<name>

# Service Management
kubectl get services                  # List services
kubectl expose deployment <name>      # Expose deployment

# Namespace Management
kubectl get namespaces                # List namespaces
kubectl create namespace <name>       # Create namespace
kubectl config set-context --current --namespace=<name>
🎉 Conclusion
Congratulations! You now understand:
✅ Kubernetes fundamentals - The building blocks
✅ Helm Charts - Package management for K8s
✅ Microservices deployment - Complex apps made simple
✅ GitOps principles - Git as the source of truth
✅ ArgoCD - Automated continuous delivery
✅ Complete workflow - From code to production
Next Steps
- Practice: Set up a test cluster and try the examples
- Explore: Check out Artifact Hub for more charts
- Contribute: Share your charts with the community
- Learn More: Dive into advanced topics like:
- Helm hooks
- ArgoCD ApplicationSets
- Progressive delivery with Argo Rollouts
- Secret management with Sealed Secrets
Additional Resources
- 📖 Helm Documentation
- 📖 ArgoCD Documentation
- 📦 Artifact Hub
- 🐙 Online Boutique Demo
- 🎓 Kubernetes Documentation
Visual References
Helm Logo & Concepts:

ArgoCD Dashboard Example:
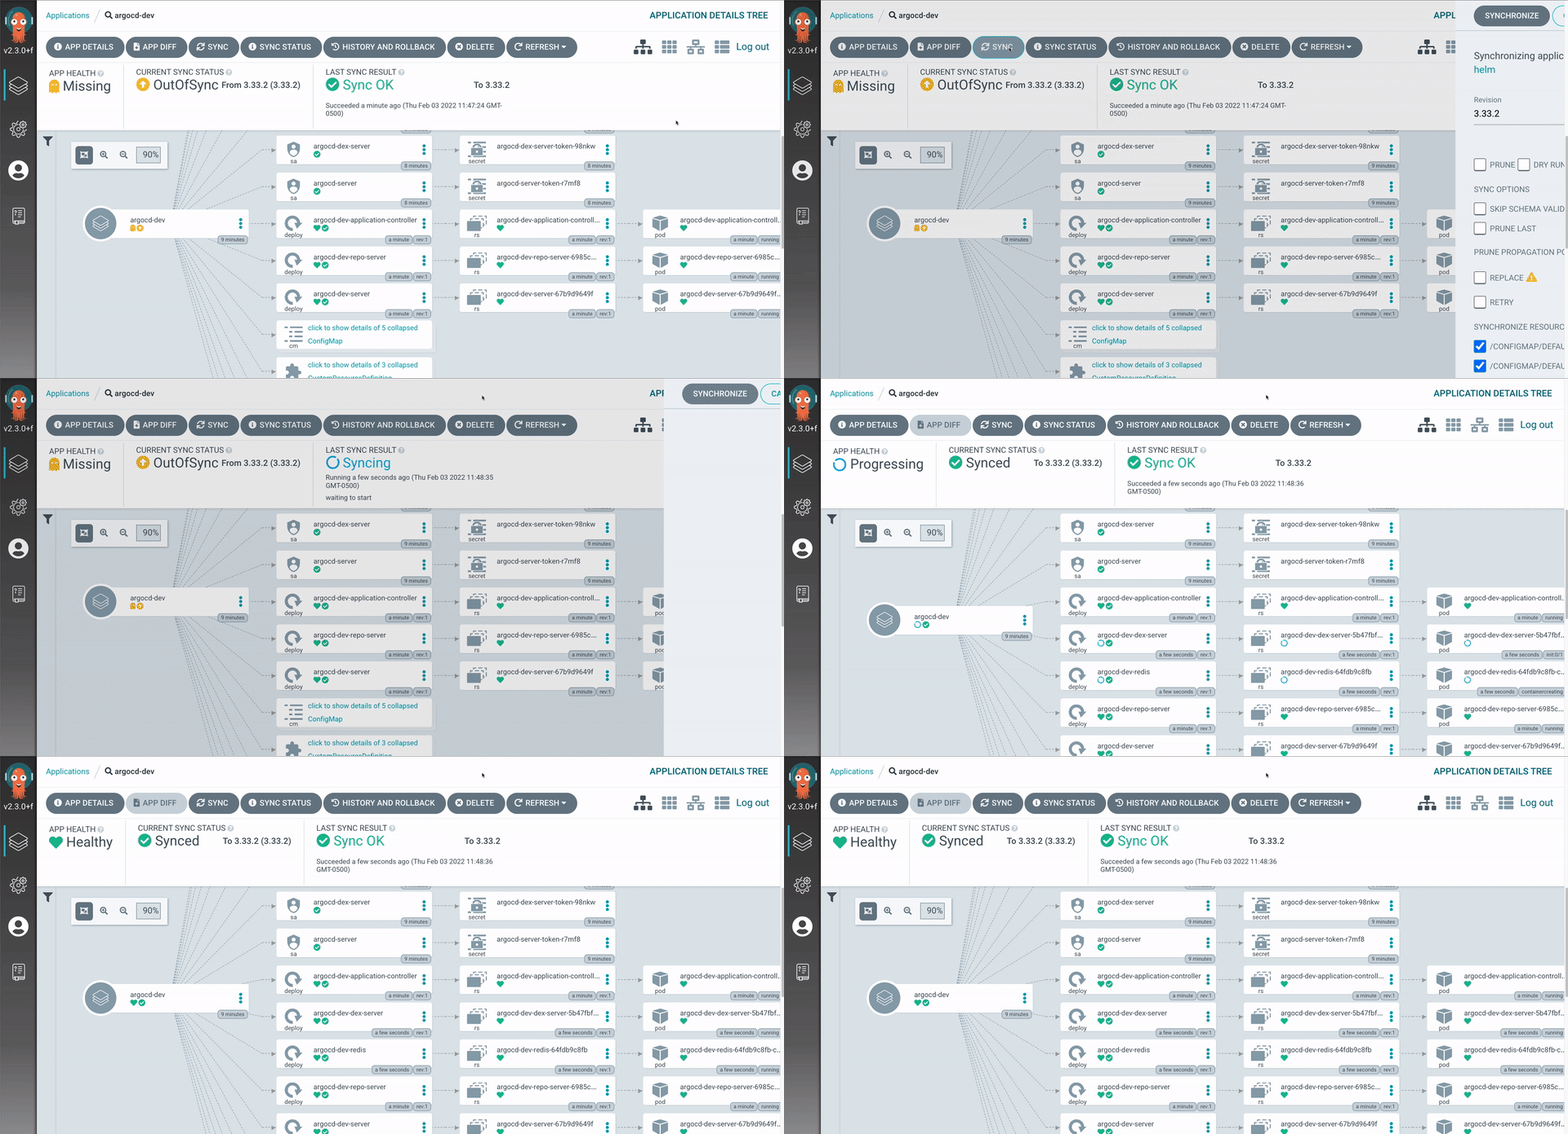
GitOps Workflow:

Made with ❤️ for DevOps Beginners
"The best way to learn is by doing. Start small, iterate often, and don't be afraid to break things in your test environment!"
Written while teaching DevOps to 800+ engineers across 12 cohorts.